Hey guys !!!
Let’s take some time off programming the new enemy system, and take a look at the ins and outs of Ayo’s tank (and projectile) !!! The result can be enjoyed in a previous post, so feast your eyes !!!
We’ll discuss (well… I’ll discuss) how to simulate wheels using Unity’s own wheel colliders, some basic physics, and some object management for the projectiles.
Tank Movement
Let’s start with the concept behind the tank, with a nice picture.
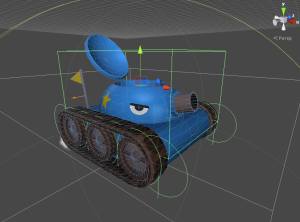
The tank is basically made of:
– A main structure (the hull): physically, a simple box collider (the green wire box) that surrounds the hull’s limits, so that the tank doesn’t go through low ceilings and such.
– Tracks: physically, a bunch of wheel colliders (the green circles), to represent each wheel, complete with suspension and torque.
– A rigidbody, attached to the object, to tell Unity to simulate physics (and thus managing the wheel collision effects).
– A mount point, on which to set Ayo when he enters the tank.
So, now that we have the basic parts set up, we can code some to make it work. Here’s the inspector view for the Tank component:

We have our physics values: motor torque, brake torque for the wheels, drag and jump force.
The component applies motor torque to the wheels when the player holds a direction, else applies brake torque to the wheels (and applies drag to the rigidbody as well, so that braking is not making the tank tilt forward when braking).
The jump force is applied upwards for the jump duration.
The center of mass is also lowered to prevent the tank from tipping. Also, because we use the physics engine and a rigidbody on which we add forces, we update the force applied in the function FixedUpdate (called after physics is simulated), else the physics engine overrides the force’s value and the tank acts a bit hectic (sometimes launching to the moon, sometimes not even jumping at all).
You can remark as well on the tank object that there are more wheel colliders than wheels. It’s because, even if wheel colliders appear round, collision is only detected downwards (on the axis of suspension), so I added wheels in front and in between the actual wheels so that the ground doesn’t go through the tracks if it’s too pointy.
Tank Animation
The wheels and tracks animations have to be done according to the wheel colliders’ rotation and position (according to the suspension).
For the rotation, we can access the wheel colliders RPM, and apply that to the wheels’ rotation.
However, for the position, it’s a bit more tricky… Because wheel colliders don’t actually move, but they update the suspension value (compressed is 0, extended is 1), so we have to acquire the wheel’s hit position, and add the wheel’s radius, or if the wheel doesn’t touch the ground, we place the wheel at its extended position.
To prevent wheels sliding horizontally, I used the wheel collider’s local height, rather than global position.
Now that the wheels are moving properly, we can set up the track to move as well.
The tank track is designed so that they have pivot that manages their position (yay for smart 3D modellers !!!), so that pivot just has to be aligned to the wheel.
The tricky part was making the track turn. This animation is completely simulated graphically. The texture is just sliding according to the wheels rotation.
So there is a script that calculates the angle of the wheel, and uses a ratio to calculate the texture displacement.
However, because the wheel can rotate towards the left or the right, the angle has to be calculated locally. Local Euler Angles (pitch, yaw and roll) are an obvious choice, but they tend to change drastically when the rotation is more than 180°, thus giving weird behaviour to the tank tracks…
The solution I chose was to calculate the wheel’s angle using the angle between the global and local upwards vector, given a sign according to the dot product between the local upwards and the global right vector.
As such, the tank tracks are reacting to the wheel’s rotation in any case.
Finally, the animation of the tank’s hull, and player inside, are managed by a state manager when the tank is idle, moving, jumping or shooting.
We can’t have the player be part of the tank model (because of customisation), so we set the player to the tank’s mount point, and Ayo’s animation is synced to the tank’s animation, so that he’s doing the shooting animation when the tank shoots.
Tank Cannon
What would a tank be without massive destruction power ?!?
Here comes the tank cannon !!! Well, an inspector view of it…
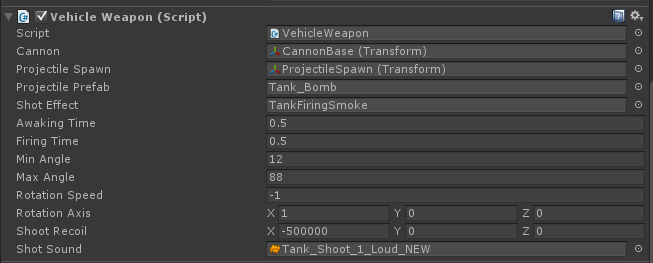
The way the cannon works is pretty straightforward. The player manages the angle of the cannon base object (managing the model’s look), in which there is a projectile spawn point. A projectile is spawned there when the player shoots (as well as particles and sounds). Shooting is limited by the firing rate.
The really neat addition to the cannon is adding some recoil to the rigidbody when shooting, to make it look very powerful !!!
Technically, projectiles are managed using object pooling, so that they are not created every time the player shoots (which would be very hungry both in CPU time, and in memory), but rather reused when necessary.
After being spawned, the projectiles fly out and explode on collision, creating an explosion. Well… Not creating, object pooling again !!!
The explosion then detects enemies and destroys the hell out of them !!!
Conclusion
I just want to list some traps I fell into, and cool things I discovered when making the tank:
– Wheel colliders don’t actually move (nor rotate). The position has to be calculated using the hit position and wheel radius, or suspension length. The rotation has to be calculated using the wheel’s RPM.
– Before simulating something physically, fake it with all you can. The tank tracks are a good example of faking it to achieve nice results. The tracks follow the wheels, and their rotation is just graphical. It can save you a lot of time to think about faking it before doing it perfectly. Also, yay for awesome 3D modellers ^^
– Rigidbodies don’t like change out of FixedUpdate.
– Vector math is much better, and more consistent than Unity’s helpers, sometimes. For example when calculating the rotation of an object, using vector math rather than Euler angles can save a lot of pain, because those can change rather quickly when things are inverted, thus giving weird behaviour.
– Object pool for everything that appears more than once in the level. Saves a lot of memory and CPU time. The set up can seem a bit painful for some objects (like enemies), but it’s all worth it in the end !!!
– Making tanks is hellafun !!! Unity makes it simple, and it’s so rewarding to shell the hell out of things ^^
That’s all folks !!!
Quentin